Nova Online Wiki:Editing guide
| “ | Oh, god oh fuck I don't know how to edit what do I do | ” |
| You, not knowing how to edit the wiki. | ||
| Notice: Page is currently a W.I.P!! |
| PROTIP: This guide is exclusively for the visual editor. If you want to know how to edit using the source editor, please go here. |
If you are new to wiki editing or want a refresher on how to edit pages on the wiki, this guide should help with that.
General guide


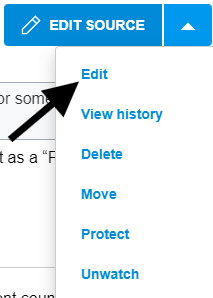
It is generally recommended that you use the Visual Editor to edit the wiki if you do not know how to use the source editor. It can be accessed by hovering over the arrow next to “EDIT SOURCE”.[1]
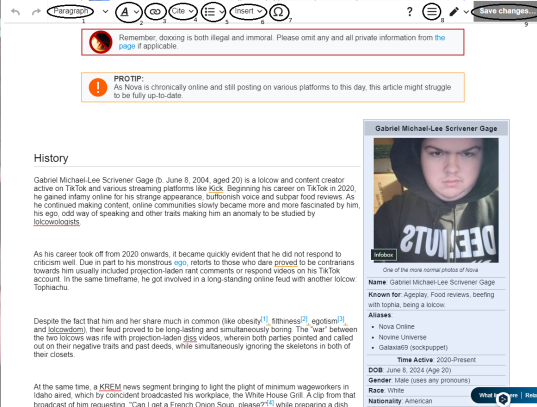
1. Paragraph format
This allows you to add header and sub-header text via a dropdown menu, you can also select the desired text with the following key binds:
- Ctrl+0 — Paragraph
- Ctrl+1 — Page title
- Ctrl+2 — Header
- Ctrl+3 — Sub-heading 1
- Ctrl+4 — Sub-heading 2
- Ctrl+5 — Sub-heading 3
- Ctrl+6 — Sub-heading 4
- Ctrl+7 — Preformatted
- Ctrl+8 — Block quote
2. Style text
This is a dropdown menu which allows you to stylize text to make it look different from the rest of the page. This helps when emphasizing something or writing in a sarcastic tone. You can also use Strike-through text along with underlined text, as well as superscript and subscript. You can also make text bigger and smaller. Furthermore, you can also put in computer code. There is also a language setting. This also comes with key binds, which being:
- Ctrl+B — Bold text
- Ctrl+I — Italic text
- Ctrl+. — Superscript
- Ctrl+, — Subscript
- Ctrl+Shift+6 — Computer code
- Ctrl+Shift+5 —
Strike-through - Ctrl+U — Underline
- Ctrl+\ or Ctrl+M — Remove
3. Link
This brings you to a pop-up which allows you to link to a different page on the wiki or an external site (i.e., YouTube)
4. Cite
This allows you to cite a source or leave a note on the page[2]. You can also reuse citations[2].
- Ctrl+Shift+K — Citation
5. Structure
This allows you to add lists. Including, but not limited to,
Bullet lists:
- Eggs
- Milk
- Bread
and Numbered lists:
- Get in
- Grab the thing
- Get out
- Profit?
You can also increase and decrease indentation on lists!
Bullet list with indentation
- eggs
- more eggs
- MORE EGGS
- MORE EGGS
- MORE EGGS
- more eggs
- Milk
- Bread
- Dr. pepper
This also has key binds
- Shift+Tab or Ctrl+[ — Decrease indentation
- Tab or Ctrl+] — Increase indentation
6. Insert
This allows you to add: images/videos, templates, tables, comments, galleries, your signature, and references.
7. Special characters
This menu allows you to insert a special character (i.e, ⇔, Ω).
8. Page options
This allows you to access the settings for the menu, as well as be able to view the page from right to left and use the find and replace feature. The find and replace feature allows you to find an instance of any word and replace all instances of it.
Keybinds:
Ctrl+Shift+X — View as right to left
Ctrl+F — Find and replace
9. Save changes
This button takes you to a menu which allows you to add a note along with your edit. You can also mark your edit as a Minor edit, and watch the page you are editing to be notified upon further edits on said page.
Keybinds
- Alt+Shift+S — Save changes
- Alt+Shift+V — Review your changes
- Alt+Shift +I — Mark your edit as a minor edit
- Alt+Shift+W — Add this page to your watch list